Jimoh Olubanwo Agbaje¹, El Moheb Mohamad² and Henri Diederich³
-
- OMFS-IMPATH Research Group, Department of Imaging and Pathology, Faculty of Medicine, Catholic University Leuven, Belgium
- 148, av Jean Jaures F- 93320 Les Pavillons-sous-bois, France
- Dental surgeon, 114 av de la Faiencerie, L-1511, Luxembourg
Aim
The aim of this publication is to present case reports to show what is possible with pterygoid implants for the rehabilitation of edentulous space in the jaw (maxilla) while avoiding sinus lifts and bone grafting procedures. In addition, the added value of one-piece implants for screwed retention is elucidated.
Keywords: Pterygoid implants; One piece implant; Edentulous patient; Rehabilitation
One-piece implants
The one-piece implant is the oldest implant placed in a human mouth. In 1931, Wilson discovered a skull in the ULUA river valley in Honduras dating around 600 AD. The skull had an artificial tooth made of one piece of stone. Since then several trials of One Piece implants were conducted until 1913 when Green-field came up with a basket implant which was the first 2 piece implant and the first implant with connection.
Among the history of implants, the one-piece implant has a good place in dental surgery procedure, examples are: Tramonte’s first screw implant, the Linkow implant and the Linkow blade. Since then, the one-piece implant undergoes a lot of modidications either in materials or in the macro or micro design. One Piece implant is also called monobloc implant. A monobloc implant is a set of dental implants comprising an implant body and a part forming a post stem, the different implants may have different angles between the implant body axis and the post stem axis, the implant bodies are designed to be fixed in the mandibular or maxillary bone. It may have a built-in abutment as seen in the Compressive Implant from ROOTT (TRATE) or the abutment may be screwed to the implant as seen in the compressive multi-unit from ROOTT (TRATE) or the tissue level implant from STRAUMANN.
One of the major changes seen in the one-piece implant by ROOTT is the special neck design that allows the angulation of the implant to correct the implant axis when it is needed. This is considered as a major change because it corrects the major disadvantage of the one-piece Implant.
The one-piece implant offers a unique monobloc design that integrates both implant and superstructure, for a quick, simple one-stage procedure or two stage procedure. The one piece or monobloc implant is based on the Schroeder single surgery philosophy. The advantage of the one-piece implant (by ROOTT) is that there is no connection between the implant body and the abutment. There is no risk of loosening a screw or a screw fracture. There is also no “pumping effect” that may induce bone loss around the implant neck.
The monobloc implant (Compressive M by ROOTT) has a tissue level connection instead of a bone level connection. This tissue level connection ensures that even if there is a pumping effect it will not induce bone resorption since it is far from the bone level.
Implants are specifically engineered for use in narrow ridges and tight spaces [1]. The implant body is tapered, it ensures a high implant stability which encourages an immediate loading process [2].
The one-piece implant (Compressive ROOTT) is an implant for immediate loading due to the built-in abutments, while the monobloc implants offer the surgeon 2 possibilities, the first is the immediate load by screwing the abutment on the implant neck at the tissue level, or a delayed load in case of weak insertion torque. One-piece implants are time efficient since there is no need for a second stage surgery, mucosal healing period which decreases patient exposure to additional pain and discomfort. The innovative geometries and advanced surface morphology of the implant offer high initial stability [3,4]. Single piece implants are less invasive and can be immediately loaded in case of good bone quality, or progressively loaded in case of less than ideal bone quality.
The one-piece implant provides a simple treatment sequence at a lower cost and it offers the possibility to treat elderly patients with a minimal invasive implant placement(Flapless implant surgery) technique.
The Flapless implant placement technique otherwise called minimally invasive procedure can be performed freehand, by using guided surgery or custom fabricated surgical guides made of casts taken at the first patient visit. This procedure, when applicable, provides patients and doctors with another treatment approach. Several clinical papers reported excellent short- and long-term survival rates (of about 98.7% at 2 years) for implants placed using flapless or minimally invasive approaches with the option of delivering immediately a pre-fabricated temporary prosthesis [5,6].
In term of implant prosthodontics, technical complexity is minimized with one-piece implants by reducing the number of components required, which also means that less treatment time is required. Patients beneϐit from having implants placed flapless and loaded immediately [6-8].
One-piece axial implants (Figure 1) are machined in grade 23 titanium with a hydroxyapatite/beta tricalcium phosphate surface (HA/BTCP). The Titanium 23 or the ELI (extra low interstice), gives a very hard alloy, harder than the Titanium grade 5. This property allows surgeon to use thin implants in the posterior region such as in the mandibular molar area where the bone is often thin
The tapered shape of the implant in addition to the surface roughness increases the implant insertion torque. This is achieved by bone condensation due to the tapered shape and increases the insertion friction resulting from implant roughness [2].
The one-piece implant is a stand-alone implant that offers patient and surgeon a new treatment option without bone graft, less morbidity and reduces the treatment time.
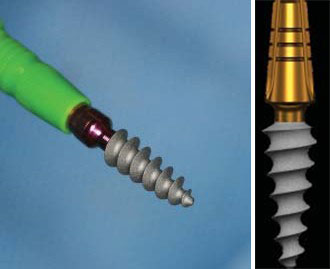
Figure 1: One-Piece implant with a compression thread.
The axial implants are generally intended for the anterior part of the mandible or the maxilla where there is sufficient bone height. They allow bicortical or even tricortical anchorage and provide good stability, even in medium-dense bone.
The following case reports describe procedures where the pterygoid implants and one- piece implants were used to rehabilitate edentulous jaws.
Case presentations
Patient 1 presented at the clinic with a reason to get fixed teeth in the maxilla. A clinical examination showed an edentulous lower arch with a resorbed ridge and few dentitions in the upper arch.
The radiographic examination using an orthopantomogram showed few teeth in the upper jaw with severe vertical resorption in the right premolar and molar regions. In the lower jaw, there is a moderate vertical bone resorption and no teeth present (Figure 2).
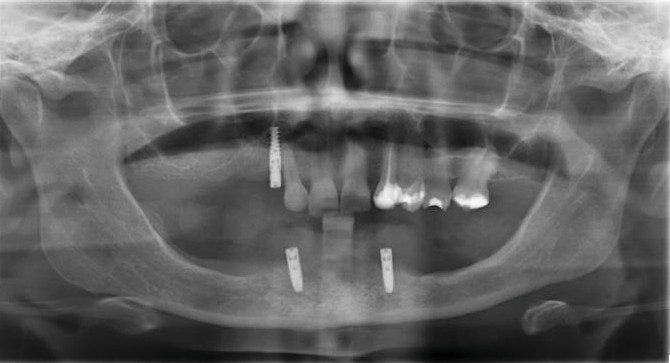
Figure 2: Shows the panoramic radiograph of the patient at presentation.
Treatment Plan: For the upper jaw a combination of pterygoid and two one-piece implants was proposed. The patient agreed to this treatment plan.
In the maxilla an open flap was made at the right tuberosity. The flap was reflected on the vestibular side and reflected in the palate. A pterygoid implant P3.5/20 mm was inserted at the right pterygoid medial plate. Thereafter one-piece implants of 3.5 mm diameter and height of 12 mm were inserted in positions 14, 15 with a torque of 35N.
The flap was then closed with polytetrafluoroethylene polymer (PTFE) monofilament non-absorbable suture.
Due to the long span and a torque of just 35N, the decision was made to go for a delayed loading. After 3 months implants were exposed surgically and healing caps were put on the implants. Then one month later the prosthetic procedure was started. Bite registration was done. Then transfer copings were inserted and an impression was taken with silicone. Also the remaining teeth were prepared for veneers and crowns Figure 3.
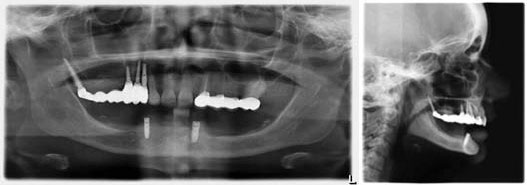
Figure 3: Panoramic radiograph of the patient after implant placement.
Five days after the try-in an appointment for prosthesis delivery was given. In the maxilla, the bridge was screwed (Figure 4). The patient was reviewed after 2 weeks. Thereafter, the patient was scheduled for follow-up at 3 months and then every 6 months.

Figure 4: Panoramic radiograph of the patient and clinical photograph of the patient after prosthesis delivery
Patient 2 presented with a similar situation as case 1, patient lost the premolar and molar teeth on the right upper jaw and presented at the clinic with a reason to get fixed teeth. A clinical examination showed a partial edentulous upper arch with resorbed ridge.
The radiographic examination using an orthopantomogram showed few teeth in the upper jaw with severe vertical resorption in the right premolar and molar region (Figure 5).
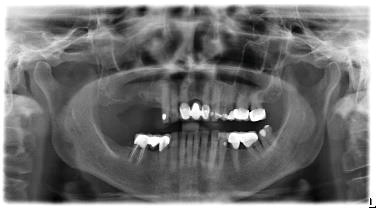
Figure 5: Shows the panoramic radiograph of the patient at presentation.
Treatment Plan: In the upper jaw a combination of pterygoid and two one-piece implants was proposed. The patient agreed to this treatment plan.
In the maxilla an open flap was made following the surgical technique previously described. Pterygoid implant P3.5/20 mm was inserted at the right pterygoid plate. Thereafter, two one-piece implants of 3.5 mm diameter and height of 12 mm were inserted in positions 14, 15 with a torque of 35N (poor bone quality). Because the torque was just 35 N we decided to go for delayed loading.
The prosthetic procedures are similar to that of patient 1.
The prosthesis delivery was a screwed bridge (Figures 6,7). The patient reviewing and follow up is also similar to previous case (follow-up at 3 months and then every 6 months).
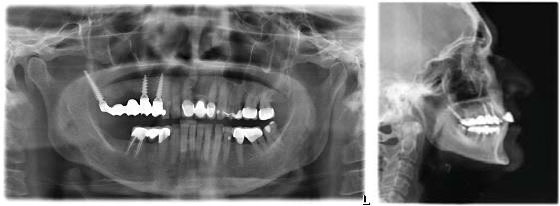
Figure 6: Panoramic radiograph of patient after implant placement.
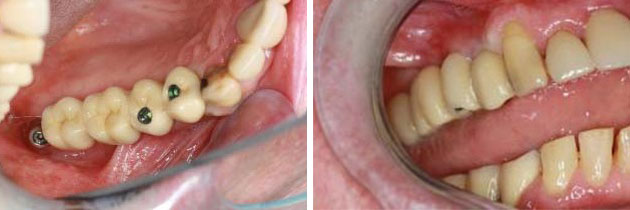
Figure 7: Images of prosthesis and patient at completion of treatment.
Patient 3 had failed restorations and a few broken teeth on the lower jaw and edentulous space on the right maxilla. A clinical examination showed periodontal involved teeth and failed restoration in the lower jaw and edentulous space on the right maxilla (Figure 8). The proposed treatment plan was the placement of implants in the upper and lower jaw. The patient agreed to this treatment plan.
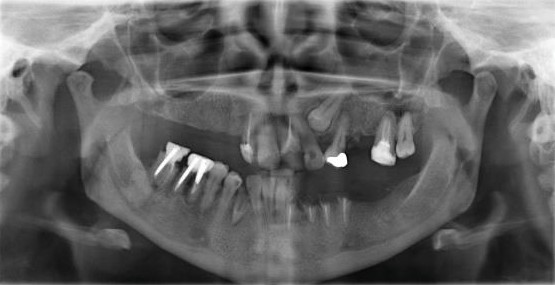
Figure 8: Panoramic radiograph of patient 3 at presentation showing edentulous upper arch with resorbed alveolus and remaining lower teeth.
In the mandible, the broken teeth as well as those with failed restorations were extracted. Thereafter, two- piece implants and one- piece implants were placed with delayed loading.
Th e peculiarity of this case is the narrow ridge in the mandible in position 44 and 32-34. To avoid bone augmentation or bone distraction procedures One- piece implants were inserted (Figure 9).
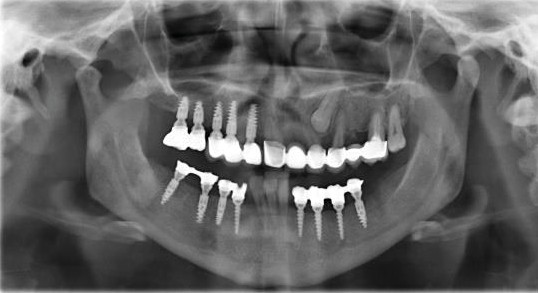
Figure 9: Panoramic radiograph of patient 2 at completion of treatment.
Patient 4 presented at the clinic with a reason to get fixed teeth in the maxilla and mandible. A clinical examination showed an edentulous upper and lower arch with resorbed ridge. Radiographic examination using an orthopantomogram showed an edentulous upper and lower jaws with moderate vertical bone resorption in the front and severe vertical resorption in the premolar and molar region (Figure 10).
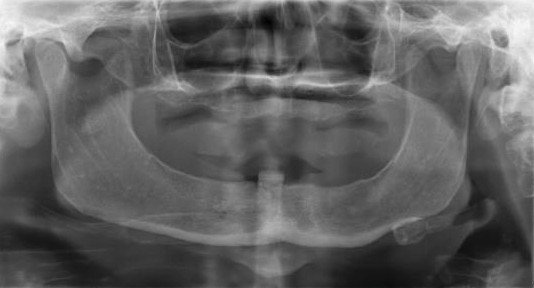
Figure 10: Panoramic radiograph of patient at presentation showing edentulous upper arch with resorbed alveolus and remaining lower teeth.
Treatment Plan: From a prosthetic point of view, the patient desired a fixed prosthetic solution. In the lower jaw a flapless immediate loading treatment with a bar for overdenture retention was proposed. For the upper jaw five two-piece implants were proposed with delayed loading. The patient agreed to this treatment plan.
Five one-piece implants and five two- piece implants were placed in the maxilla and mandible respectively at the same surgery session (Figure 11).
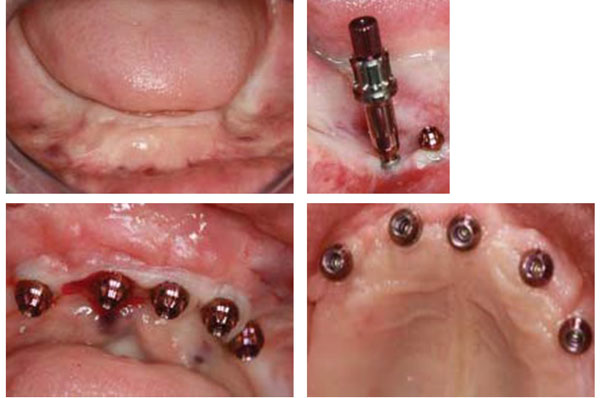
Figure 11: Surgical procedure and implant placement in the maxilla and mandible.
After an implant placement, registration was done. Then transfer copings were inserted, screwed on the implants in the mandible and an impression was taken with silicone immediately after the surgery. The prosthetic work followed the same sequence (Figure 12) and the end result was as shown in figure 13.
Two weeks after the surgery the bar was screwed and the prosthesis for the mandible was delivered (Figure 13).
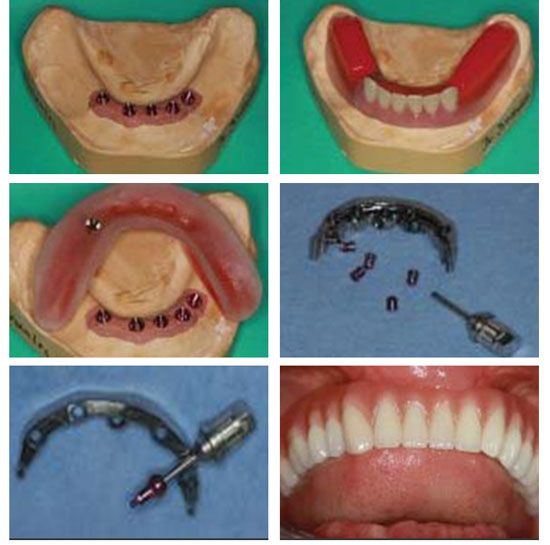
Figure 12: Laboratory steps- Bite registration, impression taken procedure, plaster key and overdenture fabrication.
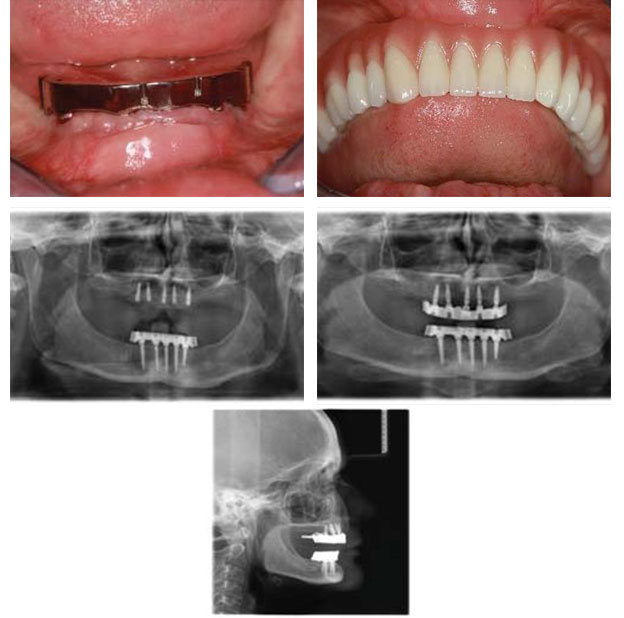
Figure 13: Panoramic radiograph of the patient and clinical photograph of the patient after prosthesis delivery.
Patient 5: A 58 years old presented at the clinic with a reason to get fixed teeth to replace the edentulous space in the upper arch. A clinical examination showed edentulous upper right arch with resorbed ridge. Radiographic examination using an orthopantomogram showed severe vertical resorption in the premolar and molar region in the right maxilla (Figure 14). In the lower jaw, several teeth were present. The proposed treatment plan was the placement of a combination of pterygoid and two Compressive 3.5 /14 mm ROOTT one-piece implant (Figure 15). The patient agreed to this treatment plan.
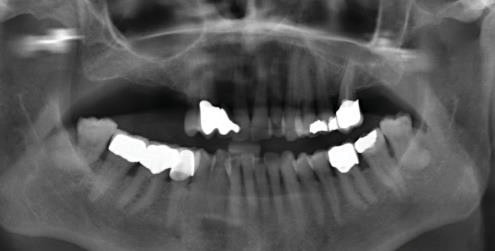
Figure 14: Panoramic radiograph of the patient at presentation showing edentulous upper arch with resorbed alveolus and remaining lower teeth.
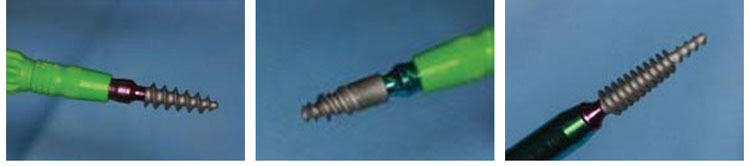
Figure 15: 3 types of implants, One piece, two-piece implant and a pterygoid implant (ROOTT-implants,TRATE AG).
In the maxilla, an open flap was made at the right tuberosity. The flap was reflected on the vestibular side in positions 18-16 the flap was also reflected in the palate. A pterygoid implant P3.5/20 mm was inserted at the right pterygoid plate. Thereafter, a one-piece implants of 3.5 mm diameter and height of 12 mm was inserted in position 14, a two-piece implant 35/10 mm was inserted in position 15with a torque of about 30 N. Because of the poor bone quality we decided to go for delayed loading (if the bone quality is good and the torque is around 50N immediate loading may be done.
The flap was then closed with polytetrafluoroethylene polymer (PTFE) monofilament non-absorbable suture.
After 3 months the prosthetic work was finished and a metal ceramic bridge (Figures 16,17).
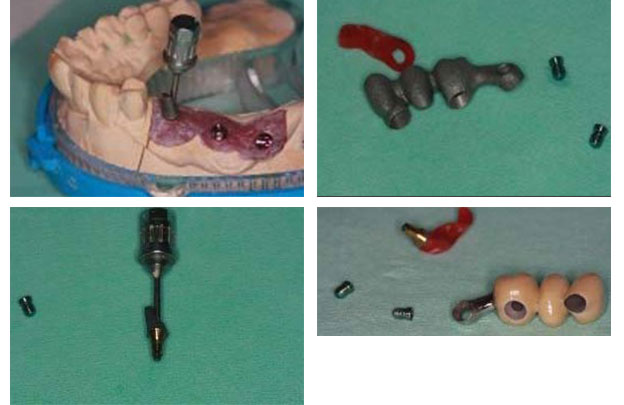
Figure 16: Laboratory step.
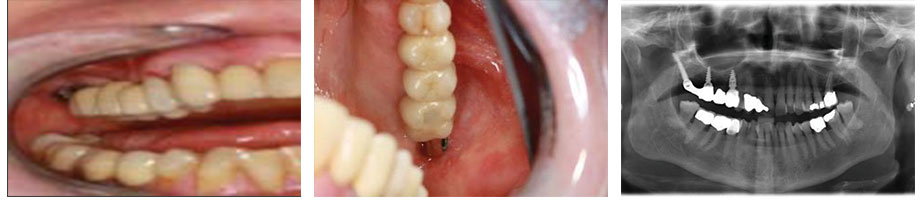
Figure 17: Panoramic radiograph and clinical photograph of the patient at the completion of treatment.
Discussion
The presented case reports describe how the pterygoid and one-piece implants were used for the functional restoration of an edentulous patient with atrophied jaw who does not want surgical procedure such as sinus lift and bone grafts. With the pterygoid and one-piece implants the patient problem of edentulism in the upper and lower jaws could be solved without additional surgical procedures.
The rehabilitation of difficult cases is achieved within a short period of time and the patient need was met without additional surgical operation.
The pterygoid implants
Description
Pterygoid Implants are single-piece conical shaped implants with compressive threads. They are relatively long and specifically manufactured with the characteristics of the pterygoid region in mind [9] (Figure 18).
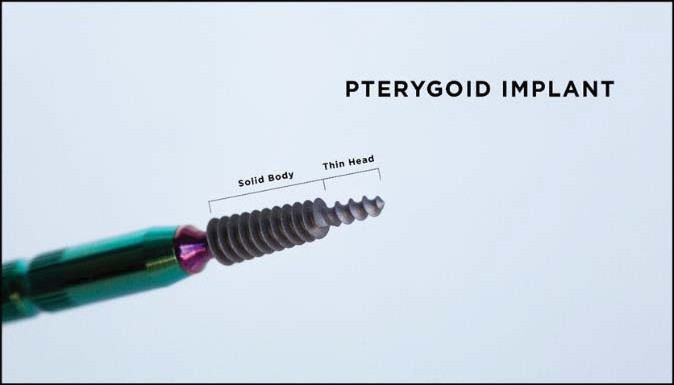
Figure 18: Pterygoid Implant.
Pterygoid implants were first proposed by Linkow in 1975 [10] and the method was first described by JF Tulasne in 1992 [11]. JF Tulasne a french maxilla-facial surgeon and Tessier were the first to describe the technique for implant placement in the pterygoid plate without grafting procedures.
Pterygoid Implant ranges from 16 to 26 mm, they have a pointed, self-tapping apex to ensure a strong anchorage when inserted [4] [12]. The implant neck has a wide thread profile which provides compression in the region of the tuberosity, where the bone is often of low density.
The new pterygoid mplants designed under the guidance of Dr. Henri Diederich, (Luxembourg) with the collaboration of the Swiss company TRATE are of 3.5- or 4.5-mm diameter with 16,18,20,22,24 mm length [9]. These single-piece implants have a surface treatment HA/TCP and have a conical shape with compressive threads (Figure 19).
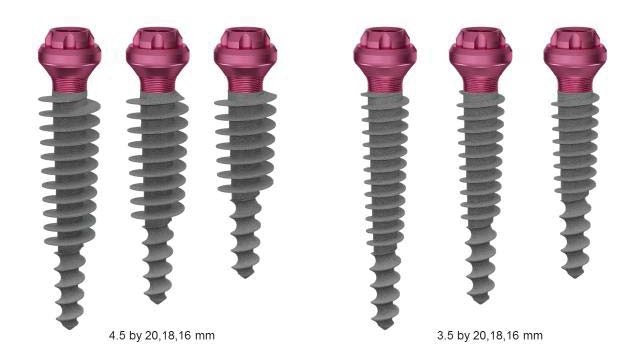
Figure 19: The 4.5- and 3.5-mm diameter pterygoid implants from TRATE.
Anatomy of the region of insertion
The support for the pterygoid mplants is derived from the tuberosity of the maxillary bone, the pyramidal process of the palatine bone, and the pterygoid process of the sphenoid bone [13] Figure 20.
The tuberosity of the maxilla has been showed to compose of a low density bone type III or type IV figure 21.
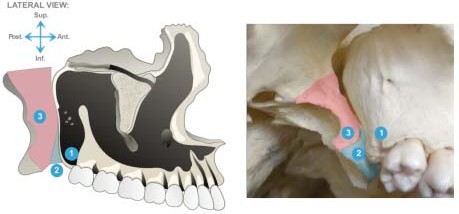
Figure 20: Anatomy of the pterygoid area is made of the assemblage of 3 bones: (1) Anterior – maxillary tuberosity; (2) The middle pyramidal process of the palatine bone articulated with the pterygoid notch; (3) Posterior: Pterygoid process of the sphenoid.
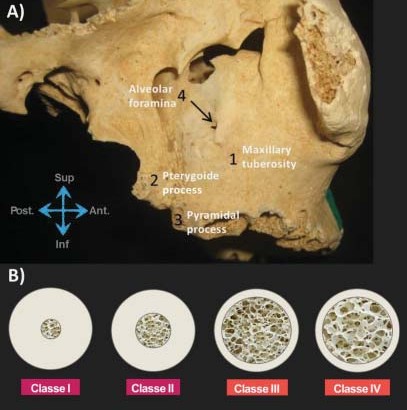
Figure 21: The tuberosity of the maxilla and diff erent types of bone density. Bone. (1) Maxillary tuberosity; (2) Pterygoid process; (3) Pyramidal process; (4) Alveolar foramina.
The pterygoid implant was introduced to solve the problem of implants restoration in the posterior maxilla due to the presence of the maxillary sinus and also as a result of limited quantity and poor quality of available bone in this region [9,14,15].
The length of the pterygoid implant ensures and engages the implant apex in the cortical bone of the medial wall of the pterygoid plate and gives a maximum compression of the cancellous bone by the large threads of the implant [9].
Surgical technique
The placement of implants in the pterygoid processrequires surgical experience and detailed knowledge of the anatomy of the posterior maxillary region. Various surgical techniques for implant insertion in this region has been described in the literature [15,16-19]. The standard surgical technique involves; making a full-thickness crestal incision on an edentulous crest as far as the back of the tuberosity, and extended by a vestibular releasing incision after anaesthesia of the region is achieved with a local anaesthetic solution. The incision design is such that the entire tuberosity, including its posterior aspect, is uncovered for visualization and instrumentation. Radiographic information is used to determine the proper drilling angle necessary to avoid perforation of the posterior sinus wall. The drill entry point is often marked 5–6 mm in front of the posterior region of the tuberosity. The drill axis runs towards the palate at about 20 – 30° in the horizontal plane and about 45° from the maxillary plane. Drilling with a pilot drill continues up to the pterygopalatine-tuberosity suture, which is the anchorage region for a pterygoid implant. Three different types of drills are used for insertion. All preparation is done in an underprepared mode, at a working speed of 600 rpm or manually. The implant is then inserted manually using a bone condensation technique, due to its self-tapping and compressive characteristics. The implant is anchored in the medial part of the pterygoid plate of the sphenoid bone, through the maxillary and palatine bones and with distal angulation between 35° and 55°, depending on the maxillary sinus floor and the height of the bone of the tuberosity.
Various modifications of the above surgical techniques have been proposed by different authors. Reasons for modifications are, to reduce surgical trauma, to increase primary stability and to reduce the failure rate of the pterygoid implant. The proposed variations in the standard protocol are aimed at minimizing surgical trauma to the bone and reduce the amount of heat generated. This is expected to reduce the high failure rates (usually during stage 2 surgery) for implants placed in the maxillary tuberosity according to Venturelli, et al. [20].
For the new terygoid implants, a different insertion technique is used. The surgical technique uses a single drill at a working speed of 600 rpm and the implant insertion is done by hand. This technique is termed soft technique. The soft technique was invented to enhance implant primary stability and encourage early prosthodontic restoration [21].
References
- Wu AY, Hsu JT, Chee W, Lin YT, Fuh LJ, et al. Biomechanical evaluation of one-piece and two-piece small-diameter dental implants: In-vitro experimental and three-dimensional fi nite element analyses. J Formos Med Assoc. 2016; 115: 794-800.
PubMed: https://pubmed.ncbi.nlm.nih.gov/27013111/ - EL Moheb Immediate Temporization using tapered implants: a case report, Implants: internatio magazine of oral implantology. 2019
- Rajput N, Siyad KP, Rathinavelu G, Chandrasekaran SC, Mohammed J. Minimally invasive transmucosal insertion and immediate provisonalization of one-piece implant in partially edentulous posterior mandible. J Clin Diagn Res. 2013; 7: 2070-2073.
PubMed: https://pubmed.ncbi.nlm.nih.gov/24179946/ - Jung RE, Grohmann P, Sailer I, Steinhart YN, Feher A, et al. Evaluation of a one-piece ceramic implant used for single-tooth replacement and three-unit fi xed partial dentures: a prospective cohort clinical trial. Clin Oral Implants Res. 2016; 27: 751-761.
PubMed: https://pubmed.ncbi.nlm.nih.gov/26212100/ - Barrachina-Diez JM, Tashkandi E, Stampf S. Att W. Long-term outcome of one-piece implants. Part II: Prosthetic outcomes. A systematic literature review with meta-analysis. Int J Oral Maxillofac Implants. 2013; 28: 1470-1482.
PubMed: https://pubmed.ncbi.nlm.nih.gov/24278914/ - Pozzi A, Polizzi G. Moy PK. Guided surgery with tooth-supported templates for single missing teeth: A critical review. Eur J Oral Implantol. 2016; 9 Suppl 1: S135-153.
PubMed: https://pubmed.ncbi.nlm.nih.gov/27314119/ - Furhauser R, Mailath-Pokorny G, Haas R, Busenlechner D, Watzek G. et al. Esthetics of Flapless Single-Tooth Implants in the Anterior Maxilla Using Guided Surgery: Association of Three-Dimensional Accuracy and Pink Esthetic Score. Clin Implant Dent Relat Res. 2015; 17 Suppl 2: e427-433.
PubMed: https://pubmed.ncbi.nlm.nih.gov/25346154/ - Cannizzaro G, Leone M, Consolo U, Ferri V, Esposito M. Immediate functional loading of implants placed with fl apless surgery versus conventional implants in partially edentulous patients: a 3-year randomized controlled clinical trial. Int J Oral Maxillofac Implants. 2008; 23: 867-875.
PubMed: https://pubmed.ncbi.nlm.nih.gov/19014156/ - Agbaje JO, Meeus J, Vrielinc L. Diederich H. Rehabilitation of Atrophic Maxilla using Pterygoid Implants: Case Reports. Modern Approaches in Dentistry and Oral Health Care. 2018; 1: 1-6.
- Linkow LL. Maxillary implants: a dynamic approach to oral implantology. North Haven, CT: Glarus Publishing. 1977; 109-112.
- Tulasne JF. Osseointegrated fi xtures in the pterygoid region. In. In: Worthington P, Branemark PI, eds. Advanced Osseointegration Surgery: Applications in the Maxillofacial Region. Chicago, Ill: Quintessence Publishing. 1992; 182-188.
- Agbaje JO, Diederich H. Cortically Fixed at Once Implants for the Treatment of the Atrophic Maxilla – A Case Report. Adv Dent & Oral Health. 2019; 1: 001-005.
- Bidra AS, Huynh-Ba G. Implants in the pterygoid region: a systematic review of the literature. Int J Oral Maxillofac Surg. 2011; 40: 773-781.
PubMed: https://pubmed.ncbi.nlm.nih.gov/21601424/ - Balaji VR, Lambodharan R, Manikandan D. Deenadayalan S. Pterygoid Implant for Atrophic Posterior Maxilla. J Pharm Bioallied Sci. 2017; 9: S261-S263.
PubMed: https://pubmed.ncbi.nlm.nih.gov/29284976/ - Agbaje JO, Diederich H. Use of cortically fi xed at once implants for the treatment of atrophic and extreme athrophic jaws. Africa J Dentistry Implantol. 2018; 43-50.
- Balshi SF, Wolfi nger GJ. Balshi TJ. Surgical planning and prosthesis construction using computer technology and medical imaging for immediate loading of implants in the pterygomaxillary region. Int J Periodontics Restorative Dent. 2006; 26: 239-247.
PubMed: https://pubmed.ncbi.nlm.nih.gov/16836166/ - Candel E, Penarrocha D. Penarrocha M. Rehabilitation of the atrophic posterior maxilla with pterygoid implants: a review. J Oral Implantol. 2012; 38: 461-466.
PubMed: https://pubmed.ncbi.nlm.nih.gov/21568718/ - Fortin T, Isidori M. Bouchet H. Placement of posterior maxillary implants in partially edentulous patients with severe bone defi ciency using CAD/CAM guidance to avoid sinus grafting: a clinical report of procedure. Int J Oral Maxillofac Implants. 2009; 24: 96-102.
PubMed: https://pubmed.ncbi.nlm.nih.gov/19344031/ - Salinas-Goodier C, Rojo R, Murillo-Gonzalez J. Prados-Frutos JC. Three-dimensional descriptive study of the pterygomaxillary region related to pterygoid implants: A retrospective study. Sci Rep. 2019; 9: 16179-52672.
PubMed: https://pubmed.ncbi.nlm.nih.gov/31700047/ - Venturelli A. A modifi ed surgical protocol for placing implants in the maxillary tuberosity: clinical results at 36 months after loading with fi xed partial dentures. Int J Oral Maxillofac Implants. 1996;11: 743-749.
PubMed: https://pubmed.ncbi.nlm.nih.gov/8990635/ - Diederich H, Marques AJ, Soares JG. Immediate Loading of an Atrophied Maxilla Using the Principles of Cortically Fixed Titanium Hybrid Plates. Advances in Dentistry & Oral Health (ADOH). 2017; 3: 001-003